Tutorial
Unit testing should be easy and intuitively... at least in theory. Real-life projects typically span multiple layers, are data-driven and use middleware technologies such as EJB and Hibernate.
Unitils originates from an attempt to get a more pragmatic view on unit testing. It started as a set of guidelines and resulted in an open source library containing utilities that facilitate the application of these guidelines.
Unitils modules
The rest of this tutorial describes Unitils' module system and the modules that are provided. We start with explaining how to setup a test environment to let your tests make use of these modules. The subsequent chapters dive deeper into the functionality of each of these modules.
Configuration
As with many projects, Unitils needs some configuration of its services. By default, there are 3 levels of configuration, each level overriding the settings of the previous one:
- unitils-defaults.properties: default configuration that is shipped with the distribution of Unitils
- unitils.properties: can contain project-wide configuration
- unitils-local.properties: can contain user-specific configuration
The first file, unitils-default.properties, contains default values and is packaged in the Unitils jar. There is no need to make changes to this file, but it can be used as reference, since it contains all possible configuration settings for Unitils.
The second, unitils.properties, can override the defaults and is typically used to set values for configuration settings for all developers on a project. For example if your project uses an oracle database, you can create a unitils.properties file that overrides the driver class name and url properties as follows:
database.driverClassName=oracle.jdbc.driver.OracleDriver
database.url=jdbc:oracle:thin:@yourmachine:1521:YOUR_DB
This file is not required, but if you create one, it should be placed somewhere in the classpath of your project. To get started, you can find a sample file that contains most commonly used configuration settings in following unitils.properties template.
The last file, unitils-local.properties, is optional as well. It can contain settings that override the project settings and is used for defining developer specific settings. For example, if each user uses its own unit-test database schema, you can create a unitils-local.properties for each user that contains the corresponding user name, password and database schema:
database.userName=john
database.password=secret
database.schemaNames=test_john
Each of these unitils-local.properties files should be placed in the corresponding home folders of the user's (System.getProperty("user.home")). A typical local configuration can be found in following sample unitils-local.properties template.
The name of the local file, unitils-local.properties, is also defined by a property. This makes it possible to use different names for each of the projects you are working on. For example, suppose you're using Unitils on a project named projectOne and want to start using it on a new project named projectTwo. Adding following property to the file unitils.properties of projectTwo will make Unitils use projectTwo-local.properties as the local properties file for this project:
unitils.configuration.localFileName=projectTwo-local.properties
Making your test Unitils-enabled
Unitils offers services to test classes through a test listener system. To enable Unitils to provide services to your tests, you first have to Unitils-enable them. This can be done easily by (indirectly) extending from a Unitils base test-class. Currently there are base classes for the major test frameworks:
- JUnit3: org.unitils.UnitilsJUnit3
- JUnit4: org.unitils.UnitilsJUnit4
- TestNG: org.unitils.UnitilsTestNG
As an example, suppose you have a JUnit3 test that you want to Unitils-enable:
import org.unitils.UnitilsJUnit3;

public class MyTest extends UnitilsJUnit3 {
}
Typically you would create your own base test class containing some utility behavior common for all your tests, e.g. data source injection, and then let this base class extend from one of the Unitils base classes.
When you use JUnit4 you can also Unitils-enable a class by adding a @RunWith annotation instead of extending from the base class:
import org.junit.runner.RunWith;
import org.unitils.UnitilsJUnit4TestClassRunner;

@RunWith(UnitilsJUnit4TestClassRunner.class)
public class MyTest {
}
or
import org.junit.runner.RunWith;
import org.unitils.UnitilsBlockJUnit4ClassRunner;

@RunWith(UnitilsBlockJUnit4ClassRunner.class)
public class MyTest {
}
Instead of extending from one of Unitils base classes you could also create a custom Unitils-enabled superclass by copying the source code of the base class (e.g. UnitilsJUnit3) to the custom superclass. This superclass can then still extend from another class, e.g. from Spring's AbstractDependencyInjectionSpringContextTests which is already a subclass of JUnit3's TestCase.
Module system
Before starting with the examples, let's first take a look at some of the concepts used in Unitils and how it functions under the hood.
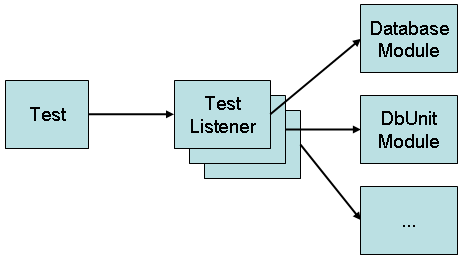
Unitils is structured as an easily extensible system of modules. Each of these modules offers some type of service to a test by listening to the execution of the test and invoking the correct service behavior when needed. The base classes that Unitils provides (UnitilsJUnit3, UnitilsJUnit4, UnitilsTestNG), couple the unit tests with the modules listening system.

This mechanism offers a uniform way for providing extra services to your tests and a flexible way of adding services without having to change the superclass of the test. Adding new services is as easy as adding a new module and registering this module in one of Unitils' configuration files.
Currently, following modules are available in Unitils:
- DatabaseModule: unit-test database maintenance and connection pooling
- DbUnitModule: test data management using DbUnit
- HibernateModule: Hibernate configuration support and automatic database mapping checking
- MockModule: support for creating mocks using the Unitils mock framework
- EasyMockModule: support for creating mocks using EasyMock
- InjectModule: support for injecting (mock) objects into other objects
- SpringModule: support for loading application contexts and retrieving and injecting Spring beans