JBehave
JBehave is a framework for Behaviour-Driven Development (BDD). But for more info you should go to the JBehave website. This module is the glue between Unitils and JBehave.
Installation
If you are using maven, you can add following dependency to your project.
01 02 03 04 05 | <dependency> <groupId>org.unitils.jbehave</groupId> <artifactId>unitils-jbehave</artifactId> <version>1.0.2</version></dependency> |
Config
Please create unitils-local.properties, and add jbehave to unitils.modules. Code as following:
01 02 03 04 05 06 07 08 09 10 11 | unitils.modules= ...,mail,webdriver,...#Add this to your unitils.properties if you need the MailModule as well.unitils.module.mail.className = org.unitils.jbehave.modules.JBehaveMailModuleunitils.module.mail.runAfter=unitils.module.mail.enabled=true#Add this to your unitils.properties if you need the WebdriverModule as well.unitils.module.webdriver.className = org.unitils.jbehave.modules.JBehaveWebdriverModuleunitils.module.webdriver.runAfter=unitils.module.webdriver.enabled=true |
How to use it...
You have f.e. a Mail story with a few scenarios where you want to check if a mail has been sent or not. This is just an example story ...
01 02 03 04 05 06 07 08 | Scenario: send correct emailGiven send an email to willemijn.wouters@unitils.beThen check if the email is sentScenario: send correct email with correct headerGiven send an email with willemijn.wouters@unitils.be with header just a testheaderThen check if the email has the correct header |
... with a few fictive steps
01 02 03 04 05 06 07 08 09 10 11 12 13 14 15 16 17 18 19 20 21 22 23 24 25 26 27 28 29 30 31 32 33 | public class SimpleMailStep { @BeforeStories public void beforeStories() { System.out.println("In before stories: " + getClass()); } @TestSmtpServer private SmtpServer smtpServer; private SimpleSender mailSender; private String address; @BeforeScenario public void beforeScenarioPhase() { String port = (String) Unitils.getInstance().getConfiguration().get(MailModule.SMTP_DEFAULT_PORT); mailSender = new SimpleSender(Integer.valueOf(port)); } @Given("send an email to $mailAddress") public void soSomeSetUp(@Named("mailAddress") String address) throws MessagingException, IOException { mailSender.sendMessage("sender@here.com", "TestHeader", "Test Body", address); this.address = address; } @Then("check if the email is sent") public void doSomeChecks() throws IOException, MessagingException { //... do some assertions... }} |
unitils-jbehave does most of the config for you, but you need to give the story(s)/step(s).
For this test I need my Mail.story, SimpleMailStep and SimpleMailStep2.
01 02 03 04 05 06 07 08 09 10 11 12 13 14 | public class SimpleMailTest extends UnitilsJUnitStories { /** * @see org.unitils.jbehave.UnitilsJUnitStories#configureJBehave() */ @Override public JBehaveConfiguration configureJBehave() { return super.configureJBehave() .addSteps(new SimpleMailStep()) .storyFile("Mail.story") .storyPackage("org/unitils/jbehave/stories"); }} |
Database features
Ofcourse you can use the annotations in the steps but if you reuse youre steps in multiple scenarios than it might be useful to put a meta tag in your story file.
At the moment there are three tags that you can use.
- @SqlScript for executing scripts.
- @Dataset (@see database testing)
- @ExpectedDataSet (@see database testing)
If you want to use this feature than you have to override the configureJBehave() method in your testclass and add the following...
010203040506070809/*** @see org.unitils.jbehave.UnitilsJUnitStories#configureJBehave()*/@OverridepublicJBehaveConfiguration configureJBehave() {returnsuper.configureJBehave().useDatabaseSteps().addSteps(newSimpleMailStep());}An example of how your story would look like:
0102030405060708091011Meta:@SqlScript path/to/script.sql@Dataset path/to/dataset.xmlScenario: TitleMeta:@Dataset path/to/scenario/dataset.xml@ExpectedDataset path/to/scenario/expected-dataset.xmlGiven ...When ...Then ...Warning: If you put f.e. an @Dataset meta tag on story and scenario level, than the meta tag on scenario level overrides the meta tag on story level. The meta tag @SqlScript is always executed before the @DataSet meta tag.
Testlink
There is also an extra meta tag for Testlink, for if you want to use our unitils-testlink module in combination with JBehave.
If you want to use this feature than you have to override the configureJBehave() method in your testclass and add the following...
01 02 03 04 05 06 07 08 09 | /** * @see org.unitils.jbehave.UnitilsJUnitStories#configureJBehave() */@Overridepublic JBehaveConfiguration configureJBehave() { return super.configureJBehave() .addSteps(new SimpleMailStep()) .addFormat(UnitilsFormats.TESTLINK);} |
An example of how your story would look like:
01 02 03 04 05 06 | Scenario: Title Meta: @TestLinkId PRJ-4 Given ... When ... Then ... |
You should add the correct properties in the unitils.properties for unitils-testlink to make it completely work.
Screenshots when a step fails
If you want that unitils-selenium automatically creates a screenshot when a step fails, than you can add the SeleniumScreenshotReporter to your configuration.
01 02 03 04 05 06 07 08 09 10 11 | /** * @see org.unitils.jbehave.UnitilsJUnitStories#configureJBehave() */@Overridepublic JBehaveConfiguration configureJBehave() { SeleniumSteps yourSeleniumSteps = new SendMailSeleniumSteps(); return super.configureJBehave() .addSteps(yourSeleniumSteps) .addStoryReporter(new SeleniumScreenshotReporter("screenshots", yourSeleniumSteps)) .addStepsWithSeleniumReporter(new SendMailSeleniumSteps(), "screenshots");} |
YourSeleniumSteps implements the org.unitils.jbehave.core.reporters.SeleniumSteps interface and contains a ScreenshotTakingwebdriver that can be used in your steps. In this case the screenshots are created in the "screenshots" directory in your target directory.
Rapportation
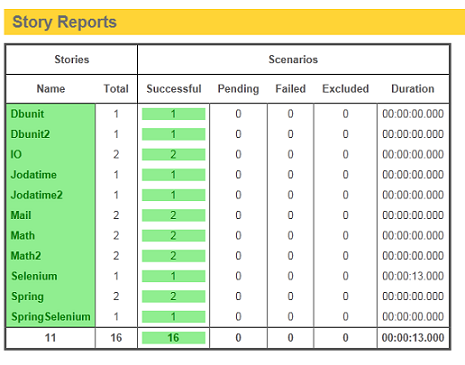
Jbehave creates rapports in the target/jbehave folder. This is an overview of all the succeeded and failed tests.

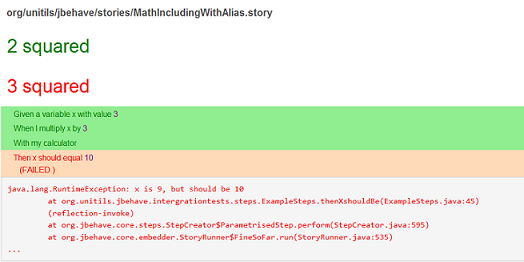
If there is something wrong, than you can click on the story to check which scenarios are passing and which are failing and why it is failing.
